Introduction
Long before the thermos bottle was invented, most working folks brought their hot drinks to work in glass milk bottles wrapped in wool blankets to keep them warm for drinking later that day. The plumber was an inventive chap, and since he had use of alcohol torches ( before gas torches ) for soldering copper and lead pipe, he had a ready fuel for heating, so it wasn't long before a plumber ( so the story goes ) rigged up a tiny stove to make coffee and heat up his lunch meal. Soon, during the years before WWII, most tradesmen and railroad workers were using this little stove. It lost favor to the glass vacuum thermos bottle during the 1950's. |
 |
Materials List
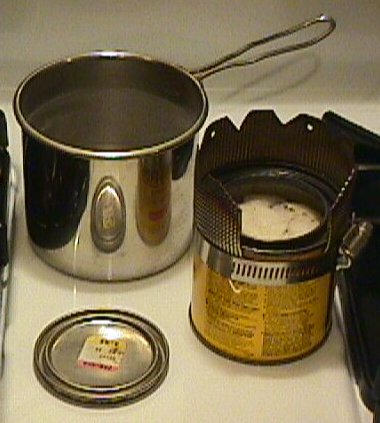
- 1/2 pint ( 8 fl oz ) paint or stain can with press-on lid
- 3-inch-wide by about 12-inch-long piece of sheet metal ( thin gauge steel - not aluminum )
- ( 1 ) Radiator hose clamp - big enough to go around the can
- ( 1 ) Bag of cotton balls
Instructions
- Use paint thinner to clean out the can of all paints or stains then wash out with soap and water.
- Stuff the can full of cotton balls to the rim. Pack them in, but not too tight.
- Wrap the sheet metal strip around the can to form a ring, and trim off excess so as to have a 3/4-round ring for the burner wind screen.
- Position the ring about 1 inch down on the can so that 2 inches protrude above the can's top and clamp on the radiator hose clamp and tighten down the metal ring to the can as tight as you can get it. (This may distort the can a bit but the steel can is very tough and it won't break it).
- Bend over the corner edges of the ring on top, so you or your pack won't get cut on it's sharp edges.
- Use a pair of sheet metal snips and cut a series of "V" groves around the top edges of the burner ring, being sure there's enough flat ring surface to support a pot or cup.
- Pour in enough alcohol fuel to soak the cotton "wick" -- that'll be about 6 to 7 oz. of fuel -- and seal the lid.
|
 |
Light My Fire
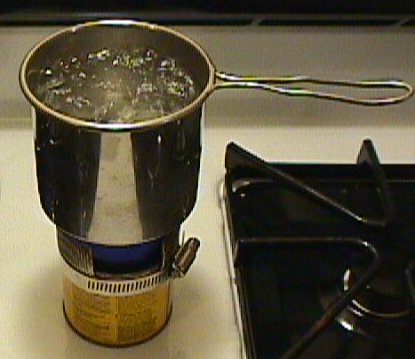
Using the Plumber"s stove is pretty straight forward, just pry off the lid with a spoon or pocket knife, light the wick and set your pot or cup of beverage on the stove in order to heat or boil.
To put out the flames , just drop the lid upside-down on the can and let it cool before sealing the lid. |
| This little stove burns about 50 minutes on one filling and will boil 16 ounces of water in ten minutes. You don't have to fill it every time you need to use it. It's very safe and the bottom stays cool when in use ( I've used it indoors many times ).
And it fits inside my camp cup!
As a bonus, in an emergency, you will have a bunch of alcohol-soaked fire starters on hand. |
 |
 |
Homemade Fuel Bottle
Take a 16 oz peroxide bottle ( very tough plastic ) and a drinking spout from a spring water bottle ( pull to open /push to close ) and you've got a super no-spill fuel bottle for alcohol fuels. |
|