| wings |
Wings THE HOME-MADE STOVE ARCHIVES |
|
|
|
|
|
|
|
|
|
| wings |
|
|
||||||||||||
| Editor's note: Charlie Duane's (Linguini) version of the stove, including an interview with Jim Mayer on the matter.
|
||||||||||||
Tuna Can Stove
Introduction
CAUTION: www.HikeVermont.com supplies these kit instructions as a public service and assumes no responsibility for injury or accidents as a result of using this information. Juniors should have correct supervision for the construction and burning of homemade stoves. Scouts should look up the Stove Safety rules on page 254 of the Boy Scout Handbook. Wear gloves when cutting metal. Solvent alcohol fuel, which is flammable and poisonous, must be handled with care. Do not let fuel run out of the burner while lighting - if that happens, you have filled the burner with too much fuel, and you could start a fire or burn your hand. Use the same common sense which applies to using a commercial stove, driving a car, or running a lawnmower. Anyone utilizing these directions assumes the entire responsiblity for safe handling of these materials and for preventing accidents. Origin The commercial Trangia stove (apparently no longer available in the US) has been used extensively by Europeans to teach cooking to their Scouts. The manufacturer supplies a complete aluminum cook kit with the stove. There is also at least one "knock-off" variation of this alcohol stove. The simplicity of the Trangia stove has apparently inspired several home-made designs which have appeared on and disappeared from the internet. A classic one from a Utah Scouting site involved cutting apart two soda pop cans. You put perlite (a porous potting soil) inside a burner made of the bottoms of the two cans. First, the burner "top" is perforated with thumbtack holes. The perlite stove makes a fascinating project and a great weekend stove. However, it may not work as well after several uses. Another tuna can design pays close attention to perforations in the top of the burner. Apparently the solvent alcohol may burn a little more efficiently in the burner if the vapors are preheated. The sample shown here is a variation of the Mayer-Robinson stove. Jim Mayer was kind enough to supply details for its use. The Mayer variation of this stove uses a single tuna can as an open burner. He eliminates a second can, that Robinson introduced to improve fuel combustion. Other Resources
Stove Kit
|
||||||||||||
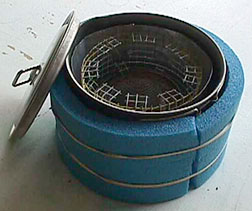
Assembling
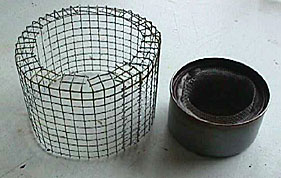
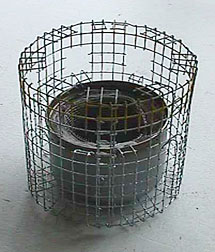
1) Put about a quarter-inch of fiberglass insulation around the inside of the tuna can. This will serve as your wick. 2) Form the small window screen into a retainer ring that will hold the fiberglass insulation in place. Once you have burned the stove several times, the retainer wire won't be necessary as long as the fiberglass stays in place. 3) Form a stand from the hardware cloth. Use metal cutters to cut it to size, and bend the ends to secure the shape. Make the base slightly smaller than the diameter of your pot, and about 1.25 inch taller than your tuna can. 4) The foil windscreen holds the heat in. Cut air passage arches at the bottom of the windscreen. Use a paperclip to adjust the size of the windscreen somewhat larger than the stove diameter. About a quarter-inch provides good air passages. 5) Wrap a piece of closed-cell foam around the outside of your pot to make a cozy. Duct tape will hold it in place. Note to item 3: Jim Mayer says, "You can gauge the right height for the stand by lighting the burner and lowering your pot until the flame burns blue and up from the burner. Too high up and the tops of the flames turn orange; too close and you start seeing combustion BELOW the rim of the can, which I suspect means that there isn't enough air flow."
Using
Cooking Mode
To Use the Stove When water boils, add dried rice or pasta, seasoning. Bring to boil again. Remove stove and place in cozy. The stove burns off the remaining fuel, so no problems with spillage. Wait about 10 minutes for pasta. To carry the hot meal in your pack, a resealable plastic bag prevents difficulties with occasional spills. In the case of carrying your hot meal, you will need a light-weight container, about the same size as the stove, to protect the windscreen and stand. Don't burn your mouth. The contents of the cookpot remain quite hot. If you eat right away, you may want to cool the cookpot in a stream for a minute. Rice and beans can stay warm in the cozy for up to three hours. Notes: "Wash" the cookpot with gravel after eating or before the next meal. The next boil will sanitize the pot. This method prevents charred food from sticking to the bottom of the pot. Attempting to "cook" over this burner may lead to hotspots and cleanup problems outside the boundaries of this system.
Storing
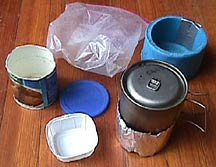
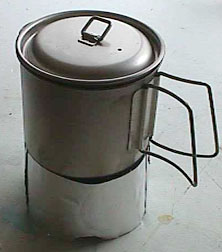
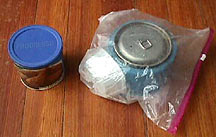
Tuna can burner, stand, foil, cookpot, and cozy are stored as a unit. The stove apparatus can be designed to fit inside your cookpot. This arrangement works fine until you carry your hot meal with you, so then you must find a way to protect the windscreen, stand, and stove inside your pack. A cardboard container works okay. Got any ideas? Stove Kit packed away. In the case of a hot meal, the burner, windscreen, and stand are protected by the cornmeal container. The hot meal travels in the cookpot, protected by the the resealable bag.
Comments
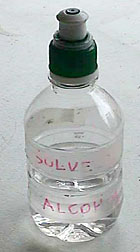
Solvent alcohol can be bought inexpensively in your local hardward store for thinning shellac or as a mild cleaner/degreaser. Boatyards also sell solvent alcohol as fuel for stoves in cruising boats. Solvent alcohol has advantages as well as disadvantages when used as fuel. It burns relatively cleanly. It is gentle on the hands and relatively safe. It is not explosive the way gas is. However, solvent alcohol does not burn as efficiently or intensely as gas. It takes longer to boil large quantities of water, so it may not be best for feeding a group going out on a single overnight. The local post office says that shipping of solvent alcohol is prohibited. Improvements 1) The weight of the resealable plastic bag and cornmeal cardboard container are unaccounted for. They were improvised on the way and could be improved upon. 2) Perhaps a soda-pop can could replace the tuna can as the burner, and save weight. 3) Perhaps the metal stand could be simplified, and the size of the foil windscreen perfected. The optimal size of the foil for reflecting heat back in could be examined. 4) The efficiency of fuel burning in an open burner could be compared with that of a two-can closed burner. In that case the weight of the second can must translate into commensurate fuel savings. 5) The positioning of the windscreen greatly affects heating performance. The windscreen reflects heat back to the pot. Positioned too tightly, it smothers the flame. Positioned too loosely, it lets too much heat escape. Proper positioning of the windscreen may be more important than design improvements to the burner. 6) The open burner is easy to light, and requires no "preheating" or "pumping". The tuna can stove begins cooking your food immediately without waste of fuel. Another design might burn fuel more efficiently, but be harder to light and take longer to warm itself to full efficiency. 7) This system worked fine at summer 50-degree temperatures. I routinely cooked 6 meals in the course of three days with 4 ounces of fuel, and usually had some fuel left over. This stove has not been extensively tested at colder temperatures. I used it once (without difficulty) at wet and windy 40-degree temperatures during training. Comment by Jim Mayer: Of course, if the stove burns too slowly the pot loses heat to the outside and things get less efficient again. In practice I've noticed that the hotter stoves will bring two cups of cold water to a boil in just over five minutes and very quickly therafter run out of fuel. On the other hand, I have a slower burner that takes about six minutes but burns for about three minutes after that on the same amount (two tablespoons) of fuel." Final Comment
Alcohol Stove Jim: If you like that kind of thing, Ron Moak (www.fallingwater.com) has a really interesting design on his web site (in the PCT 2000 planning section). I haven't built it yet, but it is a neat, one piece design. He also has a great suggestion for simmering using an alcohol or esbit stove (just use a small candle). Take a look! Oh, and its a really nice website anyway... I read his and his wife's AT journal from 1977 a couple of years ago and loved it. I like my Evernew Titanium pot very much. I have the 1.3 liter and the 0.9 liter pots. I got one from REI and the other from MEC (a Canadian company). I particularly like the built-in handle (as opposed to a pot lifter). The one thing about the titanium pots is that they scorch like crazy if you actually try to COOK something in them. I use the alcohol stove/titanium pot combo as part of a cooking system where meal preparation looks like:
I made my pot cozy out of Reflectix, which I find in hardware stores for insulating pipes. It looks like aluminum foil covered bubble wrap. You can also use an old piece of closed cell foam, or, for that matter, an old fleece hat! The idea is just to insulate the pot and let the food cook in its own heat. I suppose you could use Ron's candle idea instead... I haven't tried it. Have fun. -- Jim Linguini: My son has done a science fair project with the soda can/perlite method, after seeing me fool with it. I found those soda cans burned slower after several tries. I also tried loading cotton and alcohol in a can that can be recovered after use (like a paint/varnish container). It didn't seem to burn hot or efficiently. Is there anything to a stove design that improves efficiency? Like pre-heating, compression that comes from heat, or air/vapor flow? Jim: If you want to get into more elaborate meals, I suspect that a non-stick aluminum pot would be a much better way to go. The design I used all last summer was very simple... just a tuna can with about a 1/4" thick layer of pink fiberglass insulation around the outside. The insulation was held in place by a small strip of metal window screen. The 1/4" is the thickness AFTER being squeezed into place and isn't too critical. You need a stand that will hold the stove at a "good" height over the burner (about 1 to 1 1/2 inches seems about right) and a windscreen that will, well, block the wind. You can gauge the right height for the stand by lighting the burner and lowering your pot until the flame burns blue and up from the burner. Too high up and the tops of the flames turn orange; too close and you start seeing combustion BELOW the rim of the can, which I suspect means that there isn't enough air flow. I used 1/4" hardware cloth for the stand (I bent the top and bottom over to prevent poking and to add some strength). I also bent the ends into hooks so I can hook them together to make a ring. I made my windscreen out of an aluminum oven liner pan. I needed two strips to get enough length. I attached them together by bending the ends into hooks, interlocking them, then taping them with a kind of aluminum tape sold for use with Reflectix. The tape has held up well. You could probably use a paper clip. I punched holes in the bottom of the windscreen to let air in. As far as efficiency is concerned, there seem to be a lot of different factors and different ways to measure it. For example, I've found that the hottest burning stoves are not necessarily the most fuel efficient... My suspicion is that, for an open flame stove like these, you can only get so much burning alcohol vapor under the pot. At some point you end up with flames shooting up the sides and a lot of wasted heat. Of course, if the stove burns too slowly the pot loses heat to the outside and things get less efficient again. In practice I've noticed that the hotter stoves will bring two cups of cold water to a boil in just over five minutes and very quickly therafter run out of fuel. On the other hand, I have a slower burner that takes about six minutes but burns for about three minutes after that on the same amount (two tablespoons) of fuel. I'd call the slower stove more efficient. Anyway, Roy Robinson came up with a "hood" that effectively pre-heats the air and concentrates combustion. The web page that describes the "Mayer-Robinson Stove" (which is the one I assume you looked at) describes how the hood works. I don't currently use the hood, because the simple burner seems to work well enough for me. Linguini I used tap water in the kitchen. I tried winter cold tap water at first, without the windscreen. Two tablespoons of acholol fuel barely brought it to a boil. With the windscreen, medium-cold tap water boiled easily in 5 or 6 minutes on two talblespoons. I put in some dehydrated rice and tried it after a few minutes, but it was crunchy. I heated with another tablespoon of alcohol fuel and put the pot in a cozy made from a foam ground pad remnant and a couple rubber bands. After a while I tried the rice. This time it was well cooked. It was so hot that I burned my tongue, not once, but repeatedly while consuming the rice for dinner! Follow-up questions. The oven liner pan - do you use that for a windscreen because it is the lightest material for the purpose? I find that when I make a number of tests with alcohol, I have a dry nose and throat the next day. I assume that comes from watching the stove(s) so closely, and that under normal conditions you stand farther away? Jim: (1) the top of my stand does glow red. It hasn't caused any problems so far. (2) I used the oven liner because my "model" was a MSR Whisperlite windscreen. The stuff is light, but whether it is the "lightest" I couldn't say. (3) I haven't noticed any problem with a dry nose and throat, so I've got no information for you. Certainly the ventilation is better out of doors! Also, when I cook instant rice I typically do the following:
Actually, come to think of it, these are just the directions from the box! Good luck. -- Jim
Charlie Duane's (Linguini) Long Trail 2000 Hike
© 1999-2000, R.Walker, HikeVermont.Com unless otherwise noted. Contact Webmaster@hikevermont.com Updated August 28, 2000. |
||||||||||||
The Author's Website: http://www.hikevermont.com/linguini/stove3.htm |
||||||||||||
|
|
|
|
 The tuna can stove represents a light-weight strategy for cooking one-person meals on the trail. The idea is to boil (and purify) enough water for a small meal. Add dehydrated food and eat your meal about ten minutes later.