| wings |
Wings THE HOME-MADE STOVE ARCHIVES |
|
|
|
|
|
|
|
|
|
| wings |
|
|
| Editor's note: An ultralight approach to the stove basic question - what kind of fuel ? Michael's good design is the answer. You'll never run out of fuel. |
Homemade Three-Fuel Stove
After the hike, I started wishing that someone would make a multi-fuel stove that would alleviate problems like I had above. Ideally, it would burn my favorite fuel source, Esbit tabs, along with denatured alcohol (which is pretty easy to find at most trail re-supply points), and wood. That way I’d be covered no matter what my fuel situation was. Since no one seemed to be interested in making such a stove for me to buy, I finally decided to see if I could make a homemade version. The result is the stove I’m now using. It weighs only a smidgen over 4 ounces and works rather well. Following are directions on how to make a stove just like it: Parts List
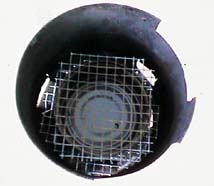
Constructing the StoveCoffee Can
Wire Mesh
Tuna Can
That's all there is to it! Using the StoveTo use the stove as a wood burner, just use the coffee can alone. Load it up with very small pieces of wood (I never use anything bigger than pencil-sized), get them going (Vaseline soaked cotton balls make wonderful fire starters), and put your pot on top. Make sure the intake vents face into the wind. The additional air coming in the vents will help the fire burn hotter. When burning wood you’ll find that you’ll need to keep your eye on the stove. It only holds a small amount of wood which will need to be replenished fairly often. My experience with this stove as a wood burner is that two cups of very cold water will require about two "can-fulls" of wood and 15 minutes to come to a boil. When the first can-full starts to burn down, lift your pot and add another load of wood, making sure that you don’t smother the fire in the process. To use the stove as an alcohol burner, put the 4 inch circle of wire mesh onto the three internal tabs, put the tuna can in the center of the wire mesh, and add alcohol to it. Then put the small wire mesh piece on top and light the alcohol. The wire mesh heats up as the alcohol burns and causes the stove to burn more efficiently. This very simple alcohol burner will get water up to a boil just as fast, if not faster, than a commercial Trangia alcohol stove. When using the alcohol stove make sure that the intake vents face away from the wind. This allows the back of the stove to provide a windscreen for the flame and greatly increases its efficiency. To use the stove as an Esbit stove, put the 4 inch circle of wire mesh onto the three internal tabs and put the tuna can upside-down in the center of the wire mesh circle. Put you Esbit fuel tab on top of the tuna can’s bottom and light it. Again, when burning Esbit tablets, make sure the intake vents of the stove face away from the wind. That’s it. If you make one of these stoves, I hope you enjoy playing with it as much as I have. Also, there’s probably a lot of room for improvement in the design of the alcohol burner for this stove. Once I got to the point where I’d found something that works as well as the commercial Trangia units, I stopped working on it. You don’t have to do the same and can likely come up with a design that’s more efficient in burning alcohol than mine. In any case, enjoy this three-fuel stove!
|
The Author's Website: http://www.monmouth.com/~mconnick/index.html |
|
|
|
|
 My homemade stove is the result of my thinking about running out of fuel. During a 3 week solo Adirondack hike, I discovered that I hadn’t brought enough Esbit fuel tabs with me. One night to conserve the Esbit fuel, I built a wood fire in a fire ring outside a shelter I was staying at. I found some rocks on which to balance my pot and moved some hot coals and small pieces of wood underneath it. The whole setup was pretty precarious and I was sure I’d end up spilling my dinner. Luckily for me that night, I managed to keep my pot balanced on the rocks during the cooking process.