| wings |
Wings THE HOME-MADE STOVE ARCHIVES |
|
|
|
|
|
|
|
|
|
| wings |
|
|
| Editor's note: An evolution of the well-known Don Johnston's masterpiece with a sturdier pot stand and a different burner holes scheme. |

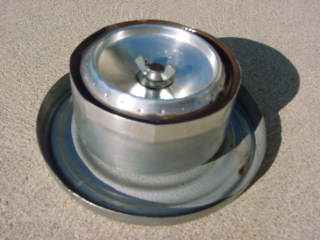
The QuestSoon after becoming a subscriber to the Internet "BackpackingLight" group I began looking for ways to reduce my pack weight. One item that came under scrutiny was my faithful MSR WhisperLite stove. While there is nothing inherently wrong with the Whisperlite, it does weigh nearly a pound. I began looking for lighter alternatives. I kept reading post after post about home made alcohol stoves. Don Johnston's Photon Stove kept rising to the surface. I went to Mr. Johnston's web page (http://members.home.net/d.h.j/stove/HighPerfAlcoholStove.html) and almost immediately began gathering the various parts and pieces to build my own. The end result is an extremely efficient, light weight cooking system that costs pennies to make. Here is my version of the Photon Stove, complete with its integrated wind screen and pot stand.
The BurnerThe burner is pretty much as Mr. Johnston described except My first attempts to punch the holes was frustrating because the small diameter needle I was using wanted to bend. After going through three needles I discovered that if I cut the needle in half and held it with a pair of small pliers it stayed straight. I used a small tack hammer and took my time. I drew a small paper template on my computer to help me position the 24 burner holes exactly 15 degrees apart. I used rubber cement to glue the template (temporarily) to the raised ring of the Pepsi can. I used a different scheme for making the filler hole. Instead of epoxying an aluminum nut to the underside of the burner can I used a slightly modified 6-32 "T" nut. I bent the tines back up into the head The Wind Screen/Pot StandMr. Johnston's design uses the MSR wind screen. I wanted something a little sturdier so I bought two feet of six inch wide aluminum flashing at my local hardware store. It cost 69 cents per foot. I cut a strip 2 7/8 inches wide by 20 1/2 inches long. I put on some heavy work gloves and sandpapered the edges until they were smooth. I finished the job with a medium grade piece of steel wool. Next I bent an 1/8 inch lip on each end to hook it together. Finally, I made another paper template for the bottom of the Instead of making the pot stand from 1/2 inch hardware cloth I devised a simpler method. I measured the circumference of the wind screen, divided it by three and cut three small notches in the top of the aluminum strip. Next I bent three pieces steel wire into an elongated "U" shape. These wires drop into the notches in the wind screen to form the pot stand. Earlier attempts to use copper and aluminum wire failed because those metals cannot withstand the high temperatures the stove produces. The CookwearI built my Photon stove around the MSR 1.0 liter stainless steel pot and cover. According to MSR, the cover doubles as Most of my trail meals consist of (1) boil two cups of water, (2) stir in contents of package, (3) let stand for a bit, and (4) eat whether its done or not. Instead of putting the pot cover on the conventional way, I turn it over (note the photo shows the cover in its "normal" position). It's designed to fit inside the rim of the pot and make a nice seal when inverted. I fill the cover with filtered water (it holds slightly more than one cup) while I'm cooking. The water does two things. First, it provides a bit of weight which helps build up some pressure inside the cook pot. This additional pressure helps cook your food a little faster. The second benefit is that when you're finished with dinner you have some warm water to clean up with. And it doesn't cost you one single additional drop of fuel. StorageI don't view Mr. Johnston's design as simply a stove. Rather I see it as a complete, integrated cooking system. In keeping with that concept, I designed everything (except the fuel bottle) to fit inside the MSR cook pot. Besides the stove components I carry a couple gas lighters and a tiny squeeze bottle for measuring fuel inside the pot. Keeping everything together really helps speed up dinner at the end of a long day on the trail. Thank You
|
The Author's Website: http://www.psnw.com/~kd7s/photonstove.html |
|
|
|
|
 I punched all the holes for the gas jets on the outside of the raised ring. The stove performed very well during initial testing so I left them that way.
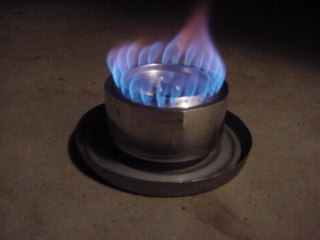 thereby making it flat again. Then I punched a small hole into the top of the burner can with an ice pick. I slowly enlarged the hole until the shank of the "T" nut just barely fit. I epoxied the nut in place with J-B Weld.
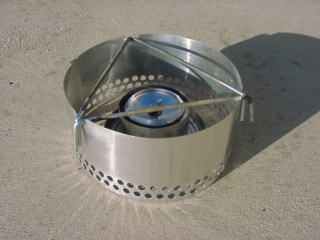 wind screen. That helped me punch the vent holes evenly. In several burn tests I discovered a second set of holes increased the two-cup-boil-time to just under four minutes.
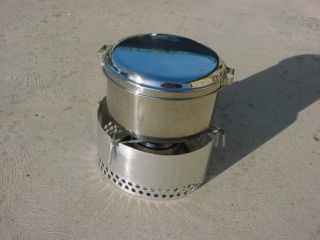 a frying pan or dinner plate. I discovered one more use for it.
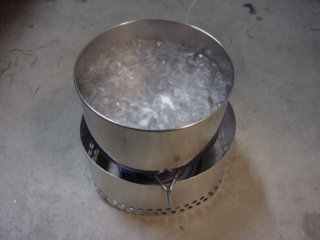 I am very grateful to Don Johnston for sharing his fabulous Photon stove with the backpacking community. If we ever meet face to face, dinner is on me.